A while ago I wrote a small tutorial on creating a simple carousel for your Xamarin.Forms app. That post also showed off a cool parallax effect on a carousel. I’ve always wanted to come back to that effect, let’s get this show on the road!
What we will be creating
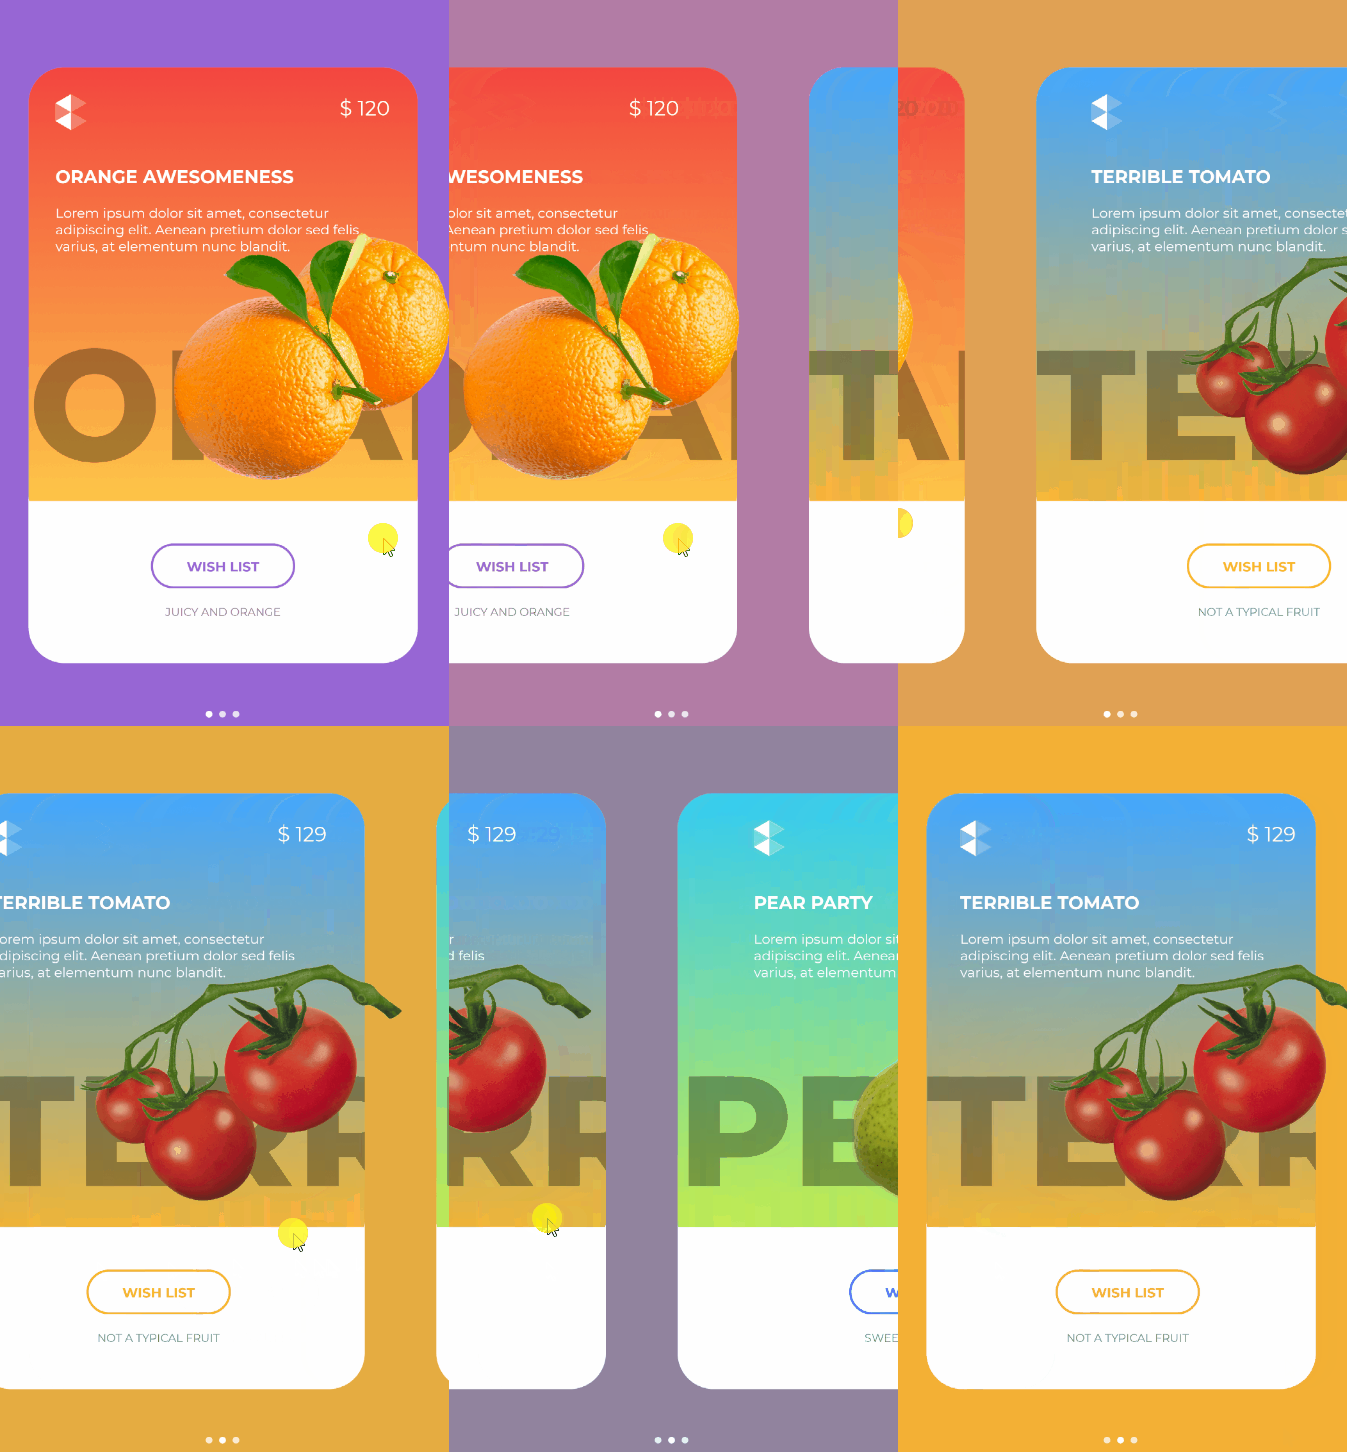
Let’s first take a look at what we want to replicate. I found this awesome carousel effect when doing some research for another post. Honestly, I’m not even sure if this is a production app, but this GIF already shows off a lot of cool things that it has going for it:
- Background color crossfading as the scroll position changes
- A nice gradient card background for each item
- A parallax effect when dragging something on- or off-screen
These are the most important parts of this. The rest of it is mainly labeling, a rounded button and other stuff that is pretty much available out-of-the-box. So, let’s get cracking!
This post might be a bit heavy on code since it might be a bit tricky to understand how the effect works. If you don’t care for the explanation scroll down, download the code and take a look at it :)

Jump aboard the carousel!
The first thing we need to add is a CarouselView of some sorts. There is no control for that in Xamarin.Forms at the time of this writing, but it would be very cool to have one. Luckily there is one available on NuGet. A nice added benefit of this control is that it has two events that are very important to get all of this stuff working:
Scrolled- Called whenever you scroll (real time) and has the percentage of the width (0-100%) that was scrolled and the scroll direction as event arguments.PositionSelected- When a slide is selected this event is called giving you the currently selected index.
These two events are essential for this whole thing to work. Especially the Scrolled event which gives us a real-time indication of where the scroll position is currently at. This is not available in the out-of-the-box ScrollView control.
Background color crossfading
Each item in the carousel has a primary color (purple, yellow and blue in this sample) which is also shown in the “Wish List” button styling. This is the final color that is shown when an item is selected in the carousel. The first thing we need to add is a view model which will hold all of our items. We use the CarouselItem view model for that, which also contains a few Color properties that will help us visualize the item.
Our main data source is a list of these CarouselItem objects, each of which represents a slide in our carousel. In the next code sample, we create some dummy data and set up the background colors for them.
Earlier on I mentioned that the Scrolled event gives us a percentage scrolled between 0-100% and a direction for each time we scroll. To create the gradient effect, we simply generate a list of a 100 colors between each slide’s primary colors. To do so, we can use the following helper method:
This gives us a list of all the colors between the first and last slide’s primary colors, which should be enough for each of the possible scroll positions. Now all we need to do is add some logic to our Scrolled event to set the background color of our page to the correct color in the list.
When implementing this we also need to take into account the scenario where users are at the first or last item in the carousel. We don’t have any overflow colors in our array, so if we’re at the last or first carousel item we simply lock it to the first or last color.
A gradient card view
This is a fairly straightforward part. I created a custom ContentView called RoundedContentView which implements most of what we need; a shadow, rounded corners and a gradient background. I will spare you from having to wade through the custom renderers for each platform, they can be found in the source code on Github :)
The parallax effect
This is the fun part! The meat of this post! The thing you probably came here for! Well, let me honestly tell you that it’s not incredibly hard to pull off, but it might be a bit tricky to understand all the moving parts.
The first thing we need to do is perform some changes to our view model. We start by creating a wrapper object, which contains our list of items. The wrapper object also contains the current scroll position of the entire carousel, which we will be using later on in our calculations. Each CarouselItem has its own Position property as well, which we will use to set its parallax offset.
To populate the positioning properties with values we once again turn our attention to the Scrolled and PositionSelected events. Whenever a carousel item is selected, we reset the current slide position to 0, meaning all the UI elements are at their base positions. When we’re scrolling we need to do some calculations to determine what side we’re scrolling towards and calculate an offset for the UI items we want to apply a parallax effect to.
This completes most of the plumbing we need, so next up we need to create an instance of the Wrapper object, add items to it and set it as the BindingContext of the page. By doing so we can now use its properties in data bindings. Because each individual slide has a Position property containing the parallax offset we can bind that property to the TranslationX property of the view elements. This translation property is used to move the view element on the horizontal axis, which makes it very suitable for use in our parallax effect!
As you can see, each element that we want to add the parallax effect to has its TranslationX property bound to the Position property. This means any changes to that property are directly propagated to the UI where elements are being moved around while we scroll. It’s a fairly simple idea, but it might be a bit hard to comprehend all the moving parts. I hope this post manages to clarify that :)
The end result
I don’t have any Nike stocks, so I decided against promoting them some more by building an exact copy of the sample above, which is why my version is a healthy fruit-based alternative. I’m very well aware that it’s not a 100% perfect match, that wasn’t the challenge here. You could definitely tinker around with it some more and make it look even better. If you do, please let me know, I’d be very interested to see it!

But…
Oh sh*t, here we go, there’s a but! Yes, there is. I tested this sample on both an Android and an iOS device, and while it looks exactly the same on both, the inner workings differ a bit.
What I noticed is that some devices don’t return the correct horizontal scroll percentage parameter correctly. Sometimes it would say that the scroll was 75% complete, whereas the carousel item was already completely off-screen. This messes up the calculations we do to get the correct background color / parallax effect.
How can we fix it?
The thing is, for this to work, we need a scroll view that gives the accurate position while you scroll. The CarouselView control used hasn’t been updated in a while and I doubt it’s still actively being developed. There is no official control in Xamarin.Forms that supports realtime scroll positions, meaning we’re essentially stuck in scrolling limbo when we want to implement something like this. It’s a shame and I hope something does become available for this in the future.
Code & tools
You can find the code here: https://github.com/sthewissen/KickassUI.ParallaxCarousel. If there’s something in there that you think can be done better in a different way or found a bug; feel free to submit a PR. I’m always looking to learn :)
The following tools were used to create this app:
- CarouselView – https://github.com/alexrainman/CarouselView
- LiveXAML – Live simulator updates for your XAML code – http://www.livexaml.com

