
Movement breathes life into your app. But getting started with animation in Xamarin.Forms might not be the simplest thing. This post explains how to get started with creating some cool animations you can use to spice up your app.
Getting to know the basics
When using mobile apps on a daily basis we may not even notice them anymore, but animations are literally everywhere. Whether it’s a micro animation like a heart icon that pulses when we hit a “like” button or a nice page transition. Animations add a lot of character to an app. Xamarin.Forms contains a few extension methods that allow you to animate view elements. By giving your view element a name using x:Name in your XAML you can access it in your page’s code-behind and use one of the following animation methods:
ScaleTo/RelScaleTo/ScaleXTo/ScaleYToRotateTo/RelRotateTo/RotateXTo/RotateYToFadeToTranslateTo
These methods can all run asynchronously, so we can either await them or drop the await keyword and chain them together using the Task API. Want to cancel your animations? That’s also possible! You can cancel your running animations using the ViewExtensions.CancelAnimations method. When you call this method it cancels all animations running on the view that is passed in as a parameter. With just these methods we can already achieve quite a few cool animations!
Sample: 3D card
As I’ve mentioned, combining these different extension methods can already be a powerful tool. The sample below shows a card in an app being slightly animated in 3D space. Obviously the effect is somewhat exaggerated for the video but you can get some really nice subtle floating movement into your cards if you want to highlight a specific one for example.
The code for it is relatively simple. It’s a matter of chaining the rotations on the different axes together and playing them at the same time. In this sample the entire thing is rotated 40 degrees on each axis in the timespan of a minute (60000 milliseconds). After that it stops, which is kind of stupid, so what do we do if we want to loop our animations?
Upping the animation ante
If we were to look under the hood of the extension methods used earlier in this post, we would find that they all share a common class in their implementation. The Animation class. This thing is at the core of Xamarin.Forms’ animation framework and allows you to do even more ludicrous animations. To create our own custom animations, we can leverage this class to animate properties that you can’t animate using the existing extension methods.
When creating a custom animation there are a few parameters our new found love, the Animation class, expects from us. We need to provide a start and end value of the property being animated and a callback method that sets this property. To run the actual animation we need to call the Commit method on the Animation object and pass in more details about our animation. A basic animation using this workflow looks like this:
Let’s break this down real quick. The animation itself scales an image up from 1x to 2x in size. The first parameter in the Commit method is the owner of the animation, which we set to the page. It runs over the course of 2000 milliseconds and once it’s done instantly resets the scale of the image back to 1. The last parameter indicates that we want to loop this animation indefinitely, which looks like this:
At this point, you might be wondering; That all looks pretty straightforward. So please do tell me, how is this more complex than those simple animations we saw earlier?
Introducing child animations
The great advantage of using the Animation class is that you can create a parent animation and link multiple child animations to it. This allows you to create complex animations. Each child has its own timing within the parent allowing for a lot of flexibility. Let’s look at a sample to illustrate, shall we?
Sample: “The Apple shake”
If you’ve ever used an Apple product and offended it you will know that UI elements start to violently shake when you do. Whether it’s providing an incorrect password or it not recognizing your face when using Face ID. We’re in the middle of a pandemic here Face ID, grooming is not a priority right now. Just look past that cavemanesque appeal of ours. Anyway, we can use this shaking effect to illustrate custom animations since it’s essentially a series of translations.
This is what that looks like:
In this sample we create an empty parent animation which will act as the container for all our child animations. We then add our child animations to it, all of which translate the element back and forth. The first two parameters of the Add method represent the relative placement of that child animation in the parent animation using a value from 0 to 1. In the sample above they follow a linear pattern, but we can also use these timings to overlap animations. This is how it looks:
Sample: Bouncing Apple icons
Because Apple does love its bouncy things, whenever an app needs your attention it’ll start bouncing in your dock. This is a nice chance to demonstrate the power of easing! We can mimic this behavior with a really simple translate animation that adds easing into the equation.
This sample does a simple translate animation but adds a bounce easing to the end of it. Easing functions specify the speed at which an animation progresses through the different points within the animation. These can be visualized in a graph. The graph below shows the difference between a linear easing (the default) and a bounce easing:
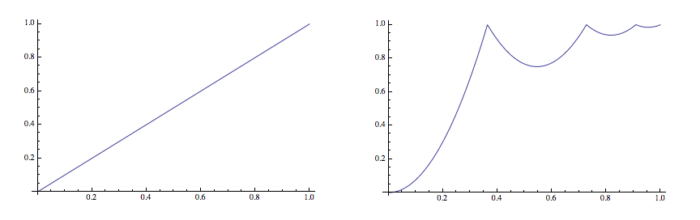 Easing visualized in a graph.
Based on the timing of the child animations we can see that the animation we coded only takes up half the time of the entire thing. This is done to create some waiting time between bounces because the animation itself is looped indefinitely. It ends up looking like this:
Down the animation rabbit hole
If you want to dive deeper into the rabbit hole you can try writing a custom animation that changes properties that you wouldn’t immediately think of when thinking of animation. The Xamarin.Forms docs have a really nice sample of that where they’ve written an extension that animates colors. The possibilities of what you can animate really are endless.

Sample: Color shifting gradients
We all love a mood light that slowly shifts colors in the background. Why not try that in our app as well? With a simple PancakeView and the color-shifting extension I mentioned earlier, we can achieve this with just a few lines of code.
Using something like this as a background with some subtle color shifting can really make an otherwise static app come to life. And seriously, who doesn’t need a nice looking gradient in their life?
Conclusion
In this post, we looked at the different ways you can animate your views in Xamarin.Forms. To do this, we leverage the Animation object or one of the existing view extension methods already written for you. You can pretty much animate any property that takes a numeric value or a complex type that can be expressed as such. That makes the animation API a really powerful tool to have in your arsenal. In the end, most of your time spent on these will probably go into tweaking them to be “just right”.
I’ve bundled all the source code for the samples above into a simple app that you can check out here https://github.com/sthewissen/AnimationsSample. Have you made a cool animation recently? Don’t be afraid to share, I’d love to see it! Reach out to me on Twitter and show off your work!