As a developer, you can create a custom renderer that allows you to target a specific type of control on a specific platform and override its built-in behavior. For example, if you want to remove the underline beneath an Android input field, you could write a single custom renderer that would apply to all your Entry fields and do just that.
In .NET MAUI the concept of renderers becomes obsolete, but bringing your current renderers to .NET MAUI can be done through the compatibility APIs. Moving forward however, handlers will replace renderers entirely. But why? There are a few underlying architectural issues within the current Xamarin.Forms implementation that have spurred the development of an alternative approach.
- The renderer and control are tightly coupled to one another from within Xamarin.Forms which isn’t ideal.
- You register your custom renderers on an assembly level. This means that for every control the platform performs an assembly scan to find if a custom renderer should be applied while starting up your app. This can be a rather slow process, relatively speaking. The Xamarin.Forms platform renderers also inject additional view elements that impact performance.
- Xamarin.Forms is an abstraction layer on top of multiple different platforms. Because of this abstraction, it can sometimes be quite difficult to reach the platform-specific code you’re looking to change from within the confines of a renderer. Private methods blocking could block your way to the thing you want to customize. The Xamarin.Forms team built additional constructs such as the platform-specifics API to get around this, but its usage is typically not obvious to users.
- Creating a custom renderer isn’t very intuitive. You need to inherit from a base renderer type that isn’t well-known, and we can say the same for the methods that you need to override. When you only want your custom renderer to apply to a specific instance of a control, you need to create a custom type (e.g. a CustomButton), target the renderer at that and use that control instead of just a regular Button. This adds a lot of unnecessary code overhead.
While those all sound like good reasons to improve, why change now? With this opportunity of reshaping the platform comes the chance for some fundamental rethinking of concepts like these that have been a bit of a sore spot. On the renderers side alone, the benefits are huge when it comes to performance, API simplification, and homogenization.
Reshaping the underlying infrastructure
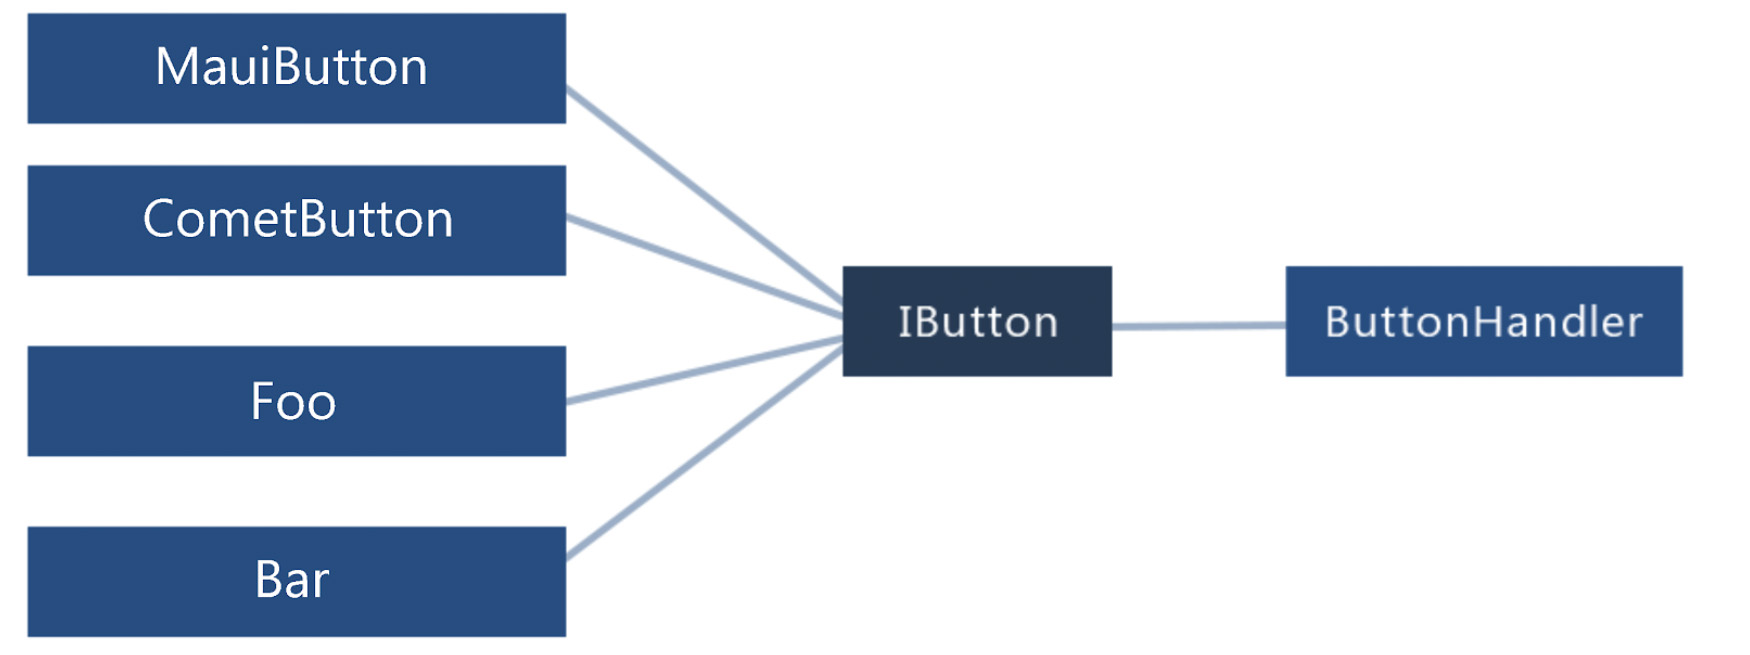
The first step in reshaping the underlying infrastructure is to make sure to remove the current tight coupling with the controls. The .NET MAUI team achieved this by putting them behind an interface and having all the individual components interact with said interface. That way it becomes easy to make different implementations of something like an IButton, while making sure the underlying infrastructure handles all these implementations in the same way. The graphic shows how that looks from a conceptual perspective.
 Abstracting away the tight coupling to the control implementations.
To prevent the need for assembly scanning with reflection, the team decided to change the way handlers are registered. Instead of registering them on an assembly level through attributes, handlers are explicitly registered by the platform and we can now explicitly register any custom handlers in our startup code. I will touch upon how to do this later in this article, but this eliminates the need for the assembly scanning penalty that we get on startup.
When it comes to making things hidden deep inside the native platform more easily reachable, the team has taken the approach of defining a mapper dictionary. The mapper is a dictionary with the properties (and actions) defined in the interface of a specific control that offers direct access to the native view object. Casting this native view object to the right type gives you instant access to platform-specific code from your shared code. The following sample shows how we can call into the mapper dictionary for a generic view and set its background color through a piece of platform-specific code. It also shows how to reach the native view.
In this sample we use the generic ViewHandler to reach the background color, because each view has a background color property. Depending on the detail level we need, we can use a more specific handler such as the ButtonHandler. This exposes the native button control directly, eliminating the need to cast it. The existing built-in platform-specifics API becomes obsolete because of this new mapper dictionary. Next, let’s take a look at how we can change an existing custom renderer into a handler to see how the overhead that currently exists has been improved.
Differences between renderers and handlers
The Xamarin.Forms renderer implementation is fundamentally a platform-specific implementation of a native control. To create a renderer, we perform the following steps:
- Subclass the control you want to target. While not required, this is a good convention to adhere to.
- Create any public facing properties you need in your control.
- Create a subclass of the
ViewRendererderived class responsible for creating the native control. - Override
OnElementChangedto customize the control. This method is called when the control is created on screen. - Override
OnElementPropertyChangedwhen wanting to target when a specific property changed its value. - Add the ExportRenderer assembly attribute to make it scannable.
- Consume the new custom control in your XAML file.
Let’s see how we can create something similar using .NET MAUI. The process to create a handler is as follows:
- Create a subclass of the ViewHandler class responsible for creating the native control.
- Override the CreateNativeView method that renders the native control.
- Create the mapper dictionary to respond to property changes.
- Register the handler in the startup class.
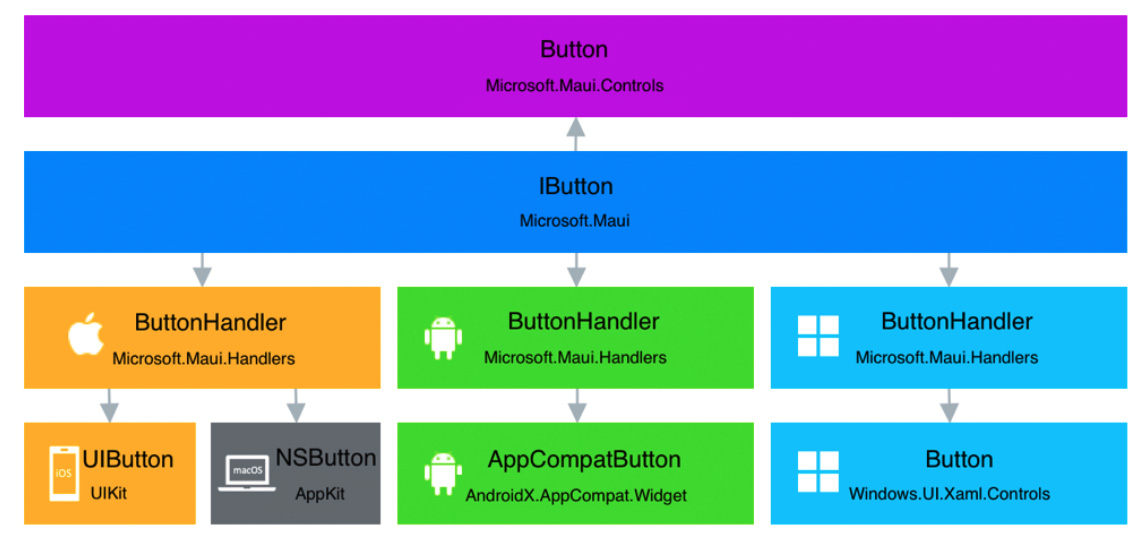
While similarities exist between the two, the .NET MAUI implementation is a lot leaner. A lot of the technical baggage that came with the custom renderers has also been cleaned up, in part due to changes within the .NET MAUI internals. You can find the architecture for the handler infrastructure outlined in the image below. This sample indicates the layers a button goes through to render to the device screen.
 The .NET MAUI handler architecture.
Implementing a handler
To implement a custom handler, we start by creating a control-specific interface. We want loose coupling between control and handlers as mentioned earlier. To avoid holding references to cross-platform controls we need an interface for our control.
By having our custom control implement this interface we can target this specific type of control from our handler.
Next, we create a handler targeting the interface we defined earlier on each platform where we want to create platform-specific behavior. In this sample we target Apple’s UIButton control, which is the native button implementation on iOS.
Because this handler inherits from ViewHandler we need to implement the CreateNativeView method.
We can use this method to override default values and interact with the native control before it’s created. That way we can set a lot of the things that we would previously do in a custom renderer. Additional methods exist to tackle different scenarios, but we won’t go into that in this article.
Working with the mapper
We mentioned the mapper earlier in this article. It is the replacement of the OnElementChanged method in Xamarin.Forms, which makes it responsible for handling property changes in the handler. This is also the place where we can hook into these changes with our custom code. Here’s what the property mapper for the IMyButton we created earlier would look like:
The dictionary maps properties to static methods that we can use to handle the property changes and customize the behavior:
The last thing left to do to have this handler provide custom behavior to our button is register it. As you recall, .NET MAUI does not use assembly scanning anymore. We need to manually register the handler on startup. My next post covers how we can do that.
This post was originally part of an article written for CODE Magazine’s Focus issue on .NET 6.0. This article was written based on the available Preview builds at the time. Current previews might have changed things compared to the article.

